Showing posts with label hat. Show all posts

Wednesday, January 11, 2012

Baby Surprise in Action

Here are some shots of the BabySurprise Jacket in action! I opted for mismatched bright orange buttons... Actually leftover from my baby shower decorations!! Tip: if you use mismatched buttons a button is easier to replace if you loose it and don't keep extras for every outfit lying around...

The hat was crazy simple and made from some bulky stash noro I lost the band for. All there is to it is a rectangle long enough to go around the head folded in half, then seamed together end to end and along one side. The "ears" are just the corners... Flat and off the head, this just looks like a garter stitch rectangle. I actually made it on a plane flight after realizing at THE LAST SECOND that we were leaving somewhere warm and going somewhere cold and my child did not have a warm hat.

Here's the kiddo getting a shoulder ride from her dad!


And experiencing cold wind for the first time in her little life.  She was delighted and laughed and put her arms up, this is one of the best shots I got of the emotion.


Here's a better look at that hat and the fun orange buttons. They really take the sweater from "nice" to "incredibly cute" in a split second.  I sewed them on with an orange and magenta verrigated cotton yarn, which also helps in the cute department.

While a hat could be knocked out in nothing flat... I am very glad I had realized a week earlier that she also did not have warm pants and knocked out a pair of worsted weight footed longgies... Details and photos to come in another post!

Sunday, December 13, 2009

Super fast beret

I've been finishing up a lot of holiday gifts in the last few weeks and have a ton of projects to get caught up on posting here, but I thought I'd share my super-fast quick and dirty beret guidelines, because a project that is really fast, really simple, and only uses one skein of yarn is a great thing.

I think you'd need to use a bulky/ chunky yarn for this. With a thinner yarn and more stitches you'd need to be more refined... bulky yarn is more forgiving. These guidelines definitely assume you know what you're doing and have a good eye for estimation.

quick hat

quick hat

quick hat

Yarn used: Rowan Chunky Print (100g per 100m/ 110 yards) almost all of one ball, although any bulky yarn could be used
Needles: two sizes, one smaller for the band of ribbing and one larger for the rest of the hat. I like to knit hats on a smaller needle than "called for" on the ball band, this yarn called for a size US # 13, and I used a US #8 on the ribbing and a US #10 for the top of the hat.

Cast on the "right number" of stitches for a somewhat snug fitting band of 1x1 ribbing (even number of stitches) . In my case it was 72.

Knit in 1x1 ribbing for about 1.5 inches.

Increase substantially by working (k1 in knit stitch, knit in front and back of purl stitch) around.

Work even for about 3 inches or so.

divide work evenly in quarters (either onto 4 dpns or using stitch markers)

crown decreases: knit around, decreasing (by k2tog) one time in each quarter every row (total 4 decreases per round). I didn't want to show a "line" of decreases, so I made sure that they were in a different place every time. For example... on one round I decreased by k2tog on the third stitch after the marker, the next round I did it on the 10th stitch after each marker, changing the place on every round.

Continue that way until you have 4 sts left. on next round k2tog and knit to end, work a tiny bit of I cord on these three stitches, then draw the working yarn through the loops and weave in the end.

Voila! super simple, super fast beret!

Saturday, January 3, 2009

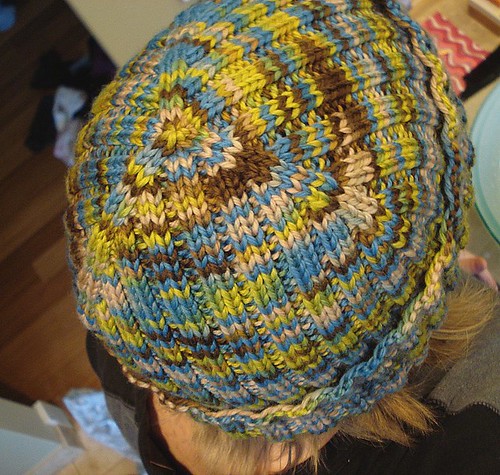
2x2 Ribbed Hat (Triangle on top!)


Who doesn't love a good 2x2 ribbed hat? I know I do. Plus, they are the perfect gifts. They are stretchy, so they'll fit almost everyone without worrying about size, and they are an easy way to get creative in the details. Here's a simple variation I made for my hubby for Christmas. I'm pretty sure that if you did stripes the top would look like concentric triangles! How neat is that?

2x2 Ribbed triangle hat:

Yarn: Worsted Weight (shown in Lorna's Laces Shepherd Worsted in Franklin's Panopticon colorway, used 1 skein with significant leftovers)

Needles: US7

Gauge: not too crucial due to stretchiness, I used recommended needle size and am not a tight or a loose knitter. Adjust accordingly.

Cast on 120 Stitches in your favorite method. I like long tail in Knit and Purl to make a reversible edge for the ribbing, or you could do all knit and pick which side you like best.

Join to knit in the round. Note, if you did a standard long tail or other non-reversible cast on, choose which side of the cast on you like best. If you're doing a folded brim, the side you like should be on the inside, if you're not, put the side you like on the outside.

Work in K2 P2 ribbing for anywhere between 6 and 10 inches (depending on how much of a folded brim you want, as shown I went a full 10 inches). Remember, the bigger the head, the more the ribbing has to stretch. That makes the hat shorter. If you are making it for someone with a bigger head than you, knit for longer than you would for your own head.

Crown Decreases:

Place markers in three evenly spaced K2 ridges (since you have 12o stitches, there will be 30 K2 ridges, your markers should be every 10th ridge). By "in the ridge" I mean in between the two knit stitches that make up the ridge.

Decrease Round: Work in ribbing until two stitches before first marker, K2tog, slip marker, SSK. Continue to work in ribbing around, decreasing in this same way at the next two markers.

Rounds 1&2: Work Decrease Round
Round 3: Work even in established ribbing (Knit the knits and purl the purls)

Rounds 4&5: Work Decrease Round
Round 6: Work even in established ribbing (Knit the knits and purl the purls)

Rounds 7-12: Work in same order as Rounds 1-6

Rounds 13+: Work Decrease Round every round until 6 stitches remain.

Break yarn, pull through remaining stitches.

Weave in ends.