
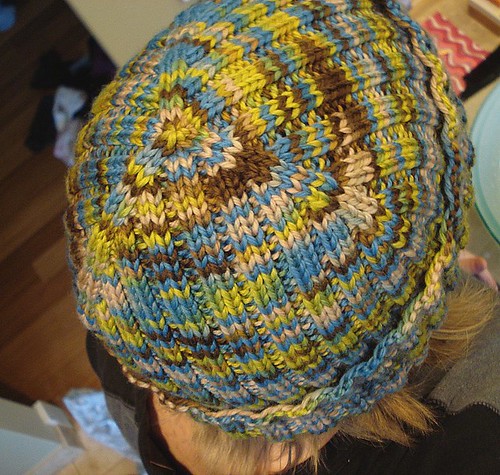
 Who doesn't love a good 2x2 ribbed hat? I know I do. Plus, they are the perfect gifts. They are stretchy, so they'll fit almost everyone without worrying about size, and they are an easy way to get creative in the details. Here's a simple variation I made for my hubby for Christmas. I'm pretty sure that if you did stripes the top would look like concentric triangles! How neat is that?
2x2 Ribbed triangle hat:
Yarn: Worsted Weight (shown in Lorna's Laces Shepherd Worsted in Franklin's Panopticon colorway, used 1 skein with significant leftovers)
Needles: US7
Gauge: not too crucial due to stretchiness, I used recommended needle size and am not a tight or a loose knitter. Adjust accordingly.
Cast on 120 Stitches in your favorite method. I like long tail in Knit and Purl to make a reversible edge for the ribbing, or you could do all knit and pick which side you like best.
Join to knit in the round. Note, if you did a standard long tail or other non-reversible cast on, choose which side of the cast on you like best. If you're doing a folded brim, the side you like should be on the inside, if you're not, put the side you like on the outside.
Work in K2 P2 ribbing for anywhere between 6 and 10 inches (depending on how much of a folded brim you want, as shown I went a full 10 inches). Remember, the bigger the head, the more the ribbing has to stretch. That makes the hat shorter. If you are making it for someone with a bigger head than you, knit for longer than you would for your own head.
Crown Decreases:
Place markers in three evenly spaced K2 ridges (since you have 12o stitches, there will be 30 K2 ridges, your markers should be every 10th ridge). By "in the ridge" I mean in between the two knit stitches that make up the ridge.
Decrease Round: Work in ribbing until two stitches before first marker, K2tog, slip marker, SSK. Continue to work in ribbing around, decreasing in this same way at the next two markers.
Rounds 1&2: Work Decrease Round
Round 3: Work even in established ribbing (Knit the knits and purl the purls)
Rounds 4&5: Work Decrease Round
Round 6: Work even in established ribbing (Knit the knits and purl the purls)
Rounds 7-12: Work in same order as Rounds 1-6
Rounds 13+: Work Decrease Round every round until 6 stitches remain.
Break yarn, pull through remaining stitches.
Weave in ends.
Thanks for posting this pattern! I look forward to trying it.
ReplyDeleteMade it and love it. I used a thicker yarn, so cast on 72 stitches. Still heaps stretchy, so will make the perfect size for the planned recipient.
ReplyDeleteLove the top of your hat! Great Job!! :)
ReplyDeletei don't get this, could you help me out, i casted on 80 stitches, how would i go about decreasing for this? if i do it this way then the 2 stitches before the marker would be purl that i would knit together, i'm just confused i think
ReplyDeletezach, I hope you come back and read this...
ReplyDeleteyour stitch marker should be in the middle of a knit 2 ridge, so your knitting should look like... k2, p2, k1 (stitch marker) k1, p2, k2, etc.
on your first decrease round each of your decreases should include one stitch from tthe k2 ridge and one purl stitch from the adjacent p2 section.
let me know if you have any other questions.
i still don't fully understand. i'm sorta new at this. i decreased differently on my last hat but I would like to learn how to do it your way,
ReplyDeletecan you sorta give me new instructions? i am using 4 ply yarn, on 4mm straight needles casting on 80 seems to be a good size, i think 120 might be too big with this stuff, so what do I do?
OK... this is going to be long in order to accomodate lots of directions, and there is a character limit on comments, so I'm breaking it up into a few comments...
ReplyDeleteI initially wrote the pattern to work in the round, so maybe that's where you are getting confused. You could do this hat flat and then seam it, but I think it would be much more difficult since you'd have to try and hide a seam in ribbing. That can be tricky. If you did want to do that, I'm not sure what the best way to modify the hat to be worked flat would be. I suppose I would split the sections at a decrease ridge and add an extra knit stitch on either side to account for the seam, but that seems like a lot more trouble than it's worth. You'd also have to work paired decreases on the backside in purl. Not un-doable, but it can be a little harder to see what's going on.
here are some more specific instructions for working in the round with the number of stitches you want to use:
This pattern is done in a 2x2 rib, so you need a stitch count divisible by 4, but then it uses three decrease points, so you need a number of ribs divisible by 3. Instead of working with 80 stitches, you could use 84, then each decrease can be evenly spaced.
ReplyDeleteSo... cast on 84 stitches, join in the round, and work in k2, p2 rib for your desired length before the decreases start.
Now you are going to place markers for your decreases.
Since you cast on 84, you have 21 ridges of knit stitches (and 21 valleys of purl stitches), each of which is made up of two stitches. Place your first stitch marker in between two of the knit stitches in one of the ridges (it doesn't matter which one).
Count seven ridges over and place your next stitch marker in between the two knit stitches in that ridge.
Count seven more ridges over and place your next stitch marker in between the two knit stitches in that ridge.
you might consider making one of your markers a different color (or shape or size) to help you keep track of each round.
You should now have three markers (one of which is different from the others), evenly spaced, each sitting inbetween two knit stitches.
ReplyDeleteThis hat works by using paired decreases on either side of the marker on each decrease round. The stitches that sit right next to each marker will always look like knit stitches, which is what will make it look like three of the ridges in the ribbing continue an unbroken line to the center of the hat. Unless you are working a decrease, you should continue to knit the knit stitches and purl the purl stithces. That way your ribbing keeps looking like ribbing.
Let's say each round starts two stitches before the first marker (It's easiest if that's the one that's different from the others)
Round 1 is a decrease round. Since you are starting your round two stitches from the first marker (that's the different looking marker), you'll start with a K2tog decrease. Then you'll slip your marker, then you'll do a SSK decrease. Now you have a bunch of stitches until you get to your next marker, continue working them in your ribbing (knitting anything that looks like a knit, and purling anything that looks like a purl). When you get to two stitches before the next marker you'll do your decreases again, k2tog, slip marker, SSK. Then keep going just like before till you get to two stitches before the third marker and do the decrease thing again: k2tog, slip marker, SSK, then keep going just like before until you get to two stitches before the special marker. That's the end of the first round.
Round two is just like round one.
For Round three don't do any decreases, just work around knitting the knits and purling the purls.
Rounds 4&5 are just like rounds 1&2, so you'll be working them with the decreases.
Round 6 is just like round three. don't do any decreases.
Your hat has fewer stitches than mine did, so you are going to have fewer rows.
For round seven AND all the future rounds, I would decrease every time (no more rounds where you don't decrease).
Keep doing decreases at every marker every time the same way you've been doing them... K2tog, slip marker, SSK... until you have six stitches left. Then break the yarn off with a few inches left over. String your yarn through the stitches and draw the hat closed like a drawstring.
Weave in ends.
hello again thank you very much for your advice,
ReplyDeletewell here is where I am right now. I am working on double pointed needles because my local yarn shop said i would need them for the decrease anyhow so it would be cheaper. i have done about 7 inches and am gonna keep going for a bit, but i was wondering, by doing this particular pattern, will the x rib sort of tighten it up.. i have tried the hat and it will fit good with the way its going, however i think this pattern looks like it tightens, am I wrong? I probably am
I'm not sure what you mean by "tightens". Ribbing is flexible and stretchy, so if it is not being worn on a head, it will spring closed and look a lot skinnier, but then it will spring back out when it is being worn.
ReplyDeleteThink of ribbing like the bellows on an accordion, it doesn't really get "tigheter" or "looser," instead it expands or contracts. With ribbing, it will contract when there is nothing holding it out, and it will expand to fit around your head.
I know that ribbing stretches I was just thinking that the x rib might tighten the whole hat, but I guess not
ReplyDeleteso... I finished the hat. i did my decrease on the purl valley before the marker, so it was 3 stitches instead of 2. anyhow, it turned out totally different but kind of cool it made a spiral sort of deal at the top. i am making another hat now that is going to turn out this way, thanks for the help and the pattern!
ReplyDeleteand i finished the next hat and it worked good, thanks again! I reall appreciate you going to the trouble
ReplyDeleteZach, Not a problem!! :-)
ReplyDeleteThanks for the pattern! I have been looking for a ribbed hat pattern with nice decreases, and thought I had found one, but it turned out to be k3 p2, which would drive me crazy with the cuff being so different. This pattern looks ideal!
ReplyDeleteThanks! I love a new take on a simple, tried-and-true concept. These decreases look so tidy!
ReplyDeleteAlso good luck to Zach in your knitting adventures!
Like Zach, I'm new at this... I cast on 96 stitches, I finished my 8" of ribbing. My last 2 stitches I worked were purl (end of round). I slipped the stitch marker. My question is, do I place another stitch marker after I knit the first stitch of the new round (the first of 24 'ridges')?. If so, I'll have 3 stitch markers, and the one I've been using to show me the end of a finished round. Right? I hope I'm making sense! Great hat!
ReplyDeleteClaire, forget the previous post. Dumb question! Thanks, Dee
ReplyDeleteClair, when I work Rounds 3, 6, 9, (the ribbing rounds) ...do I rib up to the last 2 sts before my 1st stitchmarker,(the end of round),k2tog, slip stitchmarker, SSK, and begin working on a decrease round. Is this correct?
ReplyDeleteYes you would, if I'm reading your question correctly. Each round starts two stitches before the first stitch marker, so you would have worked those stitches even (just knit the knits and purl the purls) in the ribbing row before and you'd be ready to decrease again.
ReplyDeleteBasically, you are working decreases in 2 out of every 3 rows until round #13.
Hello Claire! I knit this pattern in a solid color. The solid color makes the triangle decrease very visible and it looks super-nice! Thank you! Lookit here on my Flickr album:
ReplyDeletehttp://tinyurl.com/yl25d63
I also loved your self-pix showing your camera in the mirror. Lol. Great job!
Love this hat. Left a post on ravelry about it...I'm trying to make it without a brim...so should I only do 6" in the 2x2 rib?
ReplyDeleteDear Claire, Thanks for posting that!! Perfect decreases!! I wished i had found this BEFORE I tried doing the decrease myself on my hat here http://www.omgheart.com/?p=1987
ReplyDeleteI'm currently making another one for my friend so I will try it on this one!
I used your decrease but since I had a number that was not divisible by 3 I used 4 ribs instead of 3 (4 markers). It worked great! Since I was decreasing a little more each round than in your pattern, I knit evenly on knits/purls around for every other round until the 13th instead of every 3 rounds. Lovely decrease pattern!
ReplyDeleteAnyone interested in how the top looks with the 4 decrease rib instead of 3 can check it out here:
http://www.ravelry.com/projects/blafferty/double-rib-hat-with-square-decrease
Thank you for this! I started decreasing on a beautiful reversable cable brim 2x2 rib hat, and the pattern decrease is so ugly I have to rip it out. I've come to your pattern on my first search for an alternate decrease, and it is perfect! I can't wait to re-knit that part of the hat!
ReplyDeleteHmmm, I used bulky weight wool and cast on 120 stitches. That will give me too big a hat won't it?
ReplyDeleteThankyou for solving my dec problem.... now everyone can have a hat!
ReplyDeleteHello Claire,
ReplyDeleteI like the look of the hat from the pictures. I have been searching for a way to make a presentable decrease and I think in your patter I have finally found it. I am in the process of making my first hat using your pattern. My question is... for the decrease, can I do one decrease row then one with out decreases, and repeat this one decrease one no decrease until finished? Will the finished look remain the same (triangle on top)? Or do I have to do TWO row of decrease to one row of no decrease? hope this makes sense. In my head it works out...hahaha
You can do it in simple alternating rows, and the decreases will still form that neat triangle, but since you are decreasing less often, the top of the hat would end up being more like a cone (like a party hat). If you want it like a beanie you have to decrease more often.
DeleteMany beanie patterns have you decrease 8 stitches every other row. Since this decrease row only takes out six stitches, you have to work the decreases more often.
whoo hoo party hat!!! haha,
ReplyDeletehmmm... I am using super bulky yarn with only 48 sts co, so I am thinking two adjacent rows of decrease might go too quick? what do you think?
I don't think the weight of the yarn should make a difference. Knitting is about proportions so each row is both wider and longer. You take out more width (in inches) every row, but each row also gets you a lot closer to the middle, so it ends up you pretty much have to decrease at the same speed.
DeleteAlso, since it is ribbing, which pulls in width wise, you have to decrease faster than you do in plain stockinette to avoid the whole "party hat" look.
just finished.... looks awesome!!!! Thank you, I have finally found my favorite way to decrease 2x2 ribs. I used your suggestion and stuck with the two rows of decrease to one row of regular. I will post photos on ravelry.
ReplyDeleteHi Claire, Greetings from Rugaya in Cape Town, South Africa. Thank you so much for this pattern. Just finished a 2x2 rib hat for my husband & really struggled to keep integrity of the pattern on the crown. Failed miserably!
ReplyDeleteJust wanted to say, I semi-new at knitting did my second hat and used your close technique (I had 109 stitches) and it worked beautifully. I couldn't be more pleased your directions were supper clear and used the extra explanations in the comments for addl clarity. thank you so much !!!
ReplyDeleteHi Claire, your decrease pattern is beautiful! Can I use this pattern for a 4x4 rib hat?
ReplyDeleteThank you
Hello,
ReplyDeleteI would just like to say thank you very much.
I've been self teaching myself knitting threw videos and posts on the net. I'm kitting my first hat and I just stumbled across your post from June 18, 2009 and found it extremely helpful and well explained.